Considering installing luxury vinyl plank (LVP) flooring? Before diving in, arm yourself with essential knowledge to make the right choice. Understanding the benefits and drawbacks of LVP can save you from potential pitfalls down the road. Unlike traditional hardwood floors, LVP offers durability and water resistance at a fraction of the cost. However, it’s crucial to grasp the installation process, maintenance requirements, and long-term performance to ensure satisfaction.
Table of Contents
ToggleUnderstanding LVP Flooring
Types Of Vinyl Plank
GripStrip
- Peel off the backing for easy installation.
- Ensure proper alignment during installation.
- Use a roller for strong adhesion between planks.
ClickLock
- Insert the short tongue edge into the next plank’s groove.
- Secure with a rubber mallet gentle taps.
- Check for a snug fit between planks.
Glue-down
- Apply adhesive to the subfloor before placing planks.
- Press firmly into adhesive for a secure bond.
- Clean excess adhesive immediately for a neat finish.
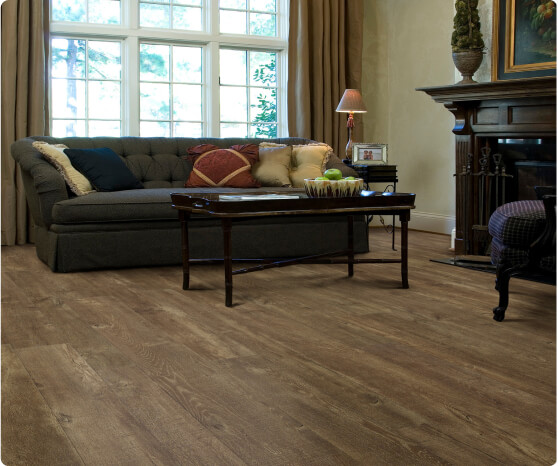
Benefits Of LVP
- Enjoy waterproof and scratch-resistant flooring.
- Wide range of design options mimicking wood or stone.
- Easy maintenance and durability are key benefits.
Choosing The Right Type
- Consider room usage, moisture levels, and budget.
- Choose between luxury vinyl plank (LVP) and standard vinyl plank.
- Select a design that complements your space.
Tools And Equipment Needed
Basic Installation Tools
- Gather essential tools like a utility knife, measuring tape, and chalk.
- Ensure you have a straightedge or level for accurate installation.
- Use a vacuum to clean the subfloor before installation.
Specialty Tools
- Consider using a tapping block for tight connections.
- Opt for a floor roller to ensure strong adhesion.
- Use a trowel to spread the adhesive evenly.
Safety Gear
- Wear protective gloves and goggles during installation.
- Use knee pads to protect your knees while working.
- Ensure good ventilation in the installation area.
When installing luxury vinyl plank (LVP) flooring, having the right tools and equipment is crucial for a successful project. Proper preparation with basic installation tools such as a utility knife, measuring tape, and chalk ensures precise measurements and cuts. Specialty tools like a tapping block for tight connections and a floor roller for strong adhesion streamline the installation process. Safety gear including protective gloves, goggles, knee pads, and adequate ventilation prioritizes your well-being during installation.
Before diving into the installation process, it’s essential to have a clear understanding of the tools required. Basic installation tools, including a utility knife for cutting planks, measuring tape for accurate dimensions, and chalk for marking guidelines, are fundamental for a seamless installation experience. A straightedge or level guarantees that your flooring is installed evenly and without bumps. Moreover, using a vacuum to clean the subfloor removes debris and ensures a smooth surface for laying the LVP flooring.
In addition to basic tools, certain specialty tools can enhance the efficiency and quality of your LVP flooring installation. A tapping block aids in connecting planks tightly without causing damage. A floor roller is indispensable for ensuring proper adhesion between the flooring and subfloor. Furthermore, using a trowel to spread the adhesive evenly across the subfloor promotes stability and longevity in your flooring installation.
Safety should always be a top priority when working on home improvement projects like installing LVP flooring. Protective gear, such as gloves to shield your hands from sharp edges and goggles to prevent eye injuries, are essential throughout the installation process. Knee pads offer comfort and protection while kneeling or crouching during installation tasks. Adequate ventilation in the installation area ensures proper air circulation, creating a safe environment free from fumes or dust particles.
Room Preparation Steps
Clearing The Area
- Remove furniture, baseboards, and old flooring before installation.
- Create a clear workspace for seamless installation.
- Keep the area clutter-free for safety and efficiency.
Subfloor Inspection
- Check the subfloor for cleanliness, levelness, and rigidity.
- Repair any cracks or imperfections in the subfloor.
- Ensure the subfloor is dry and free from moisture.
Acclimating Vinyl Planks
- Allow the vinyl planks to acclimate to room conditions for a few days.
- Store the planks flat in the installation room for proper acclimation.
- Maintain room temperature and humidity levels during acclimation.
Before installing luxury vinyl plank (LVP) flooring, it’s crucial to prepare the room adequately. Clearing the area by removing furniture, baseboards, and old flooring is essential to create a clean workspace. A clutter-free environment ensures safety and efficiency during installation.
Inspecting the subfloor is another critical step. Check for cleanliness, levelness, and rigidity to ensure a smooth installation process. Any cracks or imperfections in the subfloor should be repaired before laying down the vinyl planks. It’s important to ensure that the subfloor is dry and free from moisture to prevent any issues with the flooring later on.
Acclimating the vinyl planks to room conditions is vital for a successful installation. Allowing the planks to acclimate for a few days helps them adjust to the room conditions, ensuring better stability. Store the planks flat in the installation room to facilitate proper acclimation. It’s also essential to maintain consistent room temperature and humidity levels during this acclimation period for optimal results.
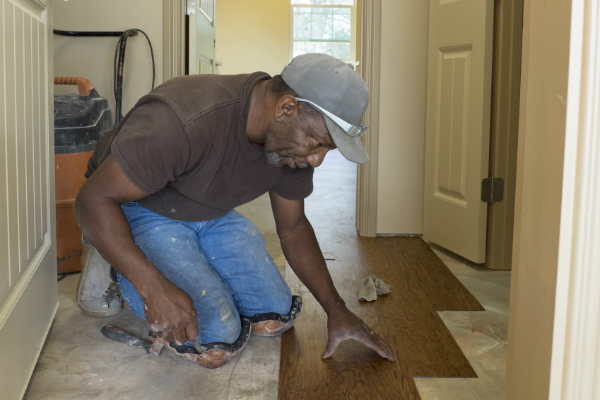
Installation Process
Installing GripStrip Planks
Start aligning the first row of planks against the wall to kick off the process. Press them firmly together to activate the adhesive properly. Utilize a roller to ensure a secure bond between each plank for stability.
Laying ClickLock Flooring
Begin by clicking the short tongue edge into the groove of the next plank securely. Secure the planks by tapping gently with a rubber mallet for a snug fit. Regularly check for any gaps between planks to achieve a seamless finish.
Applying Glue-down Planks
Spread the adhesive evenly on the subfloor before placing the planks carefully. Press each plank firmly into the adhesive to establish a strong bond for durability. Remember to wipe off any excess adhesive for a clean and polished installation.
Installation Time Frame
Factors Affecting Duration
Room size and complexity play a crucial role in determining how long it takes to install luxury vinyl plank (LVP) flooring. Larger rooms with intricate layouts will naturally require more time for installation. The more cuts and adjustments needed, the longer the process will take.
The type of vinyl plank flooring you choose can also impact the installation duration. Thicker planks or those with intricate locking mechanisms may take longer to install compared to thinner, simpler options. Plan the complexity of the flooring material before starting the installation process.
DIY installations often take longer than professional installations due to varying skill levels and experience. While DIY projects can be rewarding, they may require additional time for research, preparation, and execution. Factor in extra time for potential mistakes or learning curves when opting for a DIY approach.
Average Time Estimates
Professional installation of luxury vinyl plank (LVP) flooring typically ranges from one to two days for an entire home, depending on the size and complexity of the space. Experienced professionals can efficiently handle larger areas and intricate layouts, ensuring a timely completion of the project.
For smaller rooms or simpler layouts, DIY installation of vinyl plank flooring can be completed in just a few hours. This option is ideal for individuals looking to save on installation costs and who have basic handyman skills. However, it’s essential to allocate ample time for proper preparation and execution to achieve satisfactory results.
When planning your luxury vinyl plank (LVP) flooring installation timeline, consider factors such as room size, complexity, and your preferred installation method. Create a detailed schedule outlining each step of the process to ensure a smooth and efficient installation experience.
Post-Installation Tips
Initial Care
Vinyl plank flooring requires regular cleaning to preserve its appearance and longevity. To maintain its pristine look, clean the flooring weekly using a damp mop or cloth. Avoid using harsh chemicals as they can cause damage to the flooring over time.
Maintenance Routine
To ensure your luxury vinyl plank flooring stays in top condition, it’s crucial to establish a maintenance routine. Implement a regular cleaning schedule to keep the flooring looking new and fresh. When cleaning, make sure to use cleaning products recommended by the manufacturer for optimal maintenance. In case of spills or stains, address them promptly to prevent any potential damage from setting in.
FAQs On LVP Installation
DIY Installation Queries
When starting a DIY luxury vinyl plank (LVP) flooring project, seek guidance on specific techniques for a successful installation. Research tips and tricks to ensure a smooth and efficient process. Join online forums or communities to receive support from experienced DIYers.
Starting Point Advice
To kick off the installation, begin laying the planks from the most visible wall in the room for a polished look. Work towards the door to achieve a seamless finish without disruptions. Plan the layout meticulously to avoid unnecessary small cuts at the edges, enhancing the overall aesthetic.
Underlayment Necessities
Consider incorporating underlayment beneath your LVP for added cushioning and noise reduction benefits. Choose underlayment that is compatible with your specific type of vinyl plank flooring. Make sure to install the underlayment following the manufacturer’s guidelines for optimal performance.
Pros of using underlayment:
- Enhanced comfort underfoot
- Reduced noise transmission
Glue-down Queries
When opting for glue-down vinyl planks, familiarize yourself with the adhesive application process for a secure installation. Understand the significance of ensuring proper adhesive coverage to establish a strong bond between the planks and the subfloor. Address any uncertainties or queries you may have regarding the glue-down installation method.
Summary
You’ve learned the ins and outs of installing luxury vinyl plank (LVP) flooring. Understanding the material, gathering the necessary tools, prepping your room, following the installation steps, managing the time frame, and post-installation care are all crucial for a successful outcome. By now, you should feel equipped to tackle this project with confidence.
Ready to transform your space with LVP flooring? Dive in, follow the steps diligently, and enjoy the process. Your efforts will pay off with a beautiful and durable floor that elevates your home’s aesthetics and functionality. Happy installing!
Struggling To Find The Perfect Luxury Vinyl Plank (LVP) Flooring That Aligns With Your Unique Vision?
Located in the bustling heart of Concord, California, K Floors is your ultimate destination for turning your vision into reality when it comes to Luxury Vinyl Plank (LVP) flooring. We’re not just another flooring company; we’re your trusted partners in crafting spaces that radiate quality, dependability, and an unparalleled selection. Whether you’re envisioning the timeless elegance of wood-look LVP, the rustic charm of textured LVP, or the contemporary sophistication of high-gloss LVP, our range is as diverse as your creative imagination.
The K Floors distinction is unmistakable. Say goodbye to the uncertainty of selecting the perfect LVP flooring. Our team of seasoned experts is dedicated to guiding you every step of the way. From complimentary in-home consultations, where we bring our expertise right to your doorstep, to our collaborations with leading LVP suppliers, we ensure that excellence isn’t just a promise—it’s our legacy. Explore our extensive collection, showcasing a variety of LVP options, including Wood-Look, Textured, High-Gloss, and more. Your ideal floor isn’t merely a purchase; it’s a carefully curated choice.
At K Floors, we’re committed to delivering an experience, not just a transaction. Rooted in Concord, California, we’ve seamlessly blended traditional craftsmanship with modern aesthetics, ensuring that each LVP floor we install transforms your space into a place that truly feels like home. Whether you’re embarking on a residential renovation or a commercial transformation, every project we undertake reflects our unwavering commitment to quality and authenticity. So why delay? Step into K Floors, and let’s embark on the journey to your perfect LVP flooring together.
Disclaimer
The materials available on this website are for informational and entertainment purposes only and not to provide legal advice. You should contact your attorney to obtain advice concerning any particular issue or problem. You should not act or refrain from acting based on any content included in this site without seeking legal or other professional advice. The information presented on this website may not reflect the most current flooring developments. No action should be taken in reliance on the information contained on this website and we disclaim all liability concerning actions taken or not taken based on any or all of the contents of this site to the fullest extent permitted by law.